Saturday 10 October 2020

How to Remove Directory in Linux by command and GUI Guide for beginners

 Are you a new user of Linux OR You are trying to delete a directory in Linux, and getting error “Directory is not empty”

Don’t worry anymore. This article will help learn “How to remove directory in Linux step by step by using a command-line interface and graphical interface both.

Content

How to remove Directory in Linux

Reading this article is showing your interest to learn new thing, After completing this section you will learn how to remove an empty directory in Linux by using commands.

rmdir command is used to remove an empty directory. Syntax is very simple as follow

$rmdir /dirctory_path

If the directory is not empty, rmdir command will not remove it. you will get the error “Directory is not empty”. In the next section, you will learn how to remove the directory with its content.

vijay@Ubuntu-19:~/Documents$rmdir no_content/
vijay@Ubuntu-19:~/Documents$rmdir old_data/
rmdir: failed to remove 'old_data/': Directory not empty
vijay@Ubuntu-19:~/Documents$

rm is another command to use remove file and directory, but you must tell to rm you are removing a directory. Syntax is:

$rm -d /Directory_path

You don’t need to give the path if you are removing directory from the current directory.

See Examples:

vijay@Ubuntu-19:~/Documents$rm new_content/
rm: cannot remove 'new_content/': Is a directory
vijay@Ubuntu-19:~/Documents$rm -d new_content/
vijay@Ubuntu-19:~/Documents$rm -d old_data/
rm: cannot remove 'old_data/': Directory not empty
vijay@Ubuntu-19:~/Documents$

How to remove Directory with its content

By now you can easily remove an empty directory. I have directory name old_data is not empty. You have seen in the last section.

Use -r option with rm command.

$rm or /Directory_Path

vijay@Ubuntu-19:~/Documents$rm -r old_data/
vijay@Ubuntu-19:~/Documents$ls
vijay@Ubuntu-19:~/Documents$

You should not go through mistakes

Using -r option is not enough to remove the directory with its content. I will remove everything forgiven directory without your confirmation. If you run this command by mistake you will repent only.

Use -ir option with rm command, it will better for you. If you are working as a system administrator and have much responsibility.

vijay@Ubuntu-19:~/Documents$rm -ir old_data/
rm: descend into directory 'old_data/'? y
rm: remove regular empty file 'old_data/file5.doc'? y
rm: remove regular empty file 'old_data/file1.doc'? y
rm: remove regular empty file 'old_data/file4.doc'? 

How to remove multiple directories at the same time

If you want to remove multiple directories at the same time then you can use rm command respectively followed by -r/-ir option as per your requirements.

The syntax is simple:

$rm -ir First_Directory Second_directory Third_Directory

vijay@Ubuntu-19:~/Documents$rm -ir dir1 dir2 
rm: remove directory 'dir1'? y
rm: remove directory 'dir2'? y
vijay@Ubuntu-19:~/Documents$

If you want to remove multiple directories have a different locations. You should not worry anymore.

Go through the following example.

vijay@Ubuntu-19:~/Documents$rm -ir /home/vijay/Downloads/dir_2/ /home/vijay/Videos/dir_1/
rm: remove directory '/home/vijay/Downloads/dir_2/'? y
rm: remove directory '/home/vijay/Videos/dir_1/'? y
vijay@Ubuntu-19:~/Documents$

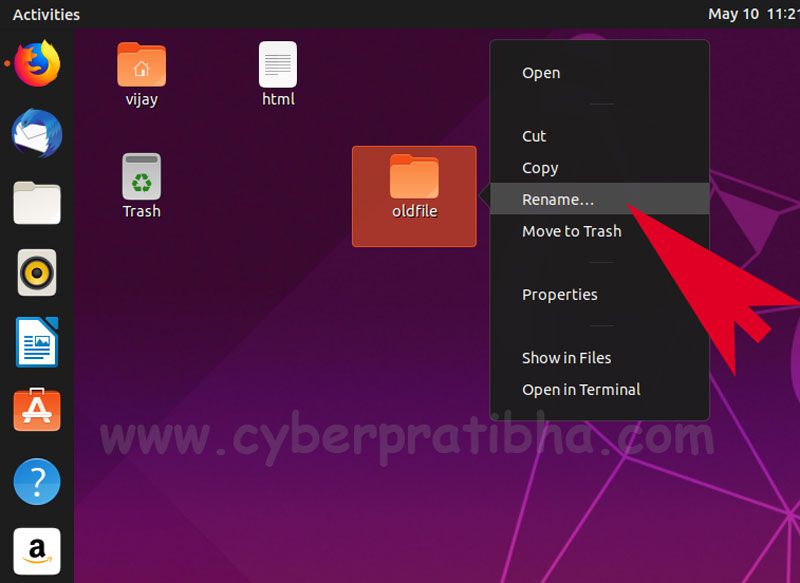
How to remove directory by using GUI

Most computer users love the graphical interface. It is easy to learn and easy to use.

Delete option is not available in Linux, Here is another option to delete directory called a move to trash.

17-how-to-delete-directory-in-linux

Video: How to remove directory in Linux in Hindi Langugage


Conclusion

By now you are an expert to remove the directory and have good knowledge of using rm and rmdir commands.

The important thing, you should remove the directory safely by using the command line.

If you have any questions, please write in the comment box. For any specific discussion please Join our Group HERE

source how to remove directory in Linux

Saturday 3 October 2020

How to Rename a File in Linux with Examples, beginner’s guide

 Do you not like the name of any file or directory? Do you want to change it? Do you want to give a new name to file or directory?

If you don’t know how to rename a file in Linux then this article is helpful for you.

When you read the complete article, You will learn about move and change the name of files.

You must read the warnings mentioned in the article. Cautions make you perfect and save you from disaster happen by using the wrong command.

mv command in linux to rename File.

mv command is most used command in Linux, mv is the short form of move.

mv command is widely used to move files and directories from one location to another location.

In other hand, mv command in Linux is also used to rename file or directory.

Basic command syntax of mv command as following:

mv [OPTION] .. [SOURCE] [DEST]

I am have created file resume.doc by mistake and I want to rename it to resume.doc in the same directory. The following syntax will be used:

vijay@Ubuntu-19:~$ mv resumex.doc resume.doc
vijay@Ubuntu-19:~$

If you want two work rename file and move file to another location from the current directory then the syntax will be as follow.

vijay@Ubuntu-19:~$mv resumex.doc Documents/resume.doc
vijay@Ubuntu-19:~$ls Documents/
resume.doc  vijay3.doc
vijay@Ubuntu-19:~$

Now, this is the another method to rename file in Linux by using mv command, If you want to rename and move file from source to destination.

For example if resumex.doc file is in /home/vijay/Videos folder and want to rename and move it to the location /home/vijay/documents.

Syntax is :

vijay@Ubuntu-19:~$ls Videos/
resumex.doc
vijay@Ubuntu-19:~$mv Videos/resumex.doc Documents/resume.doc
vijay@Ubuntu-19:~$ls Documents/
resume.doc  vijay3.doc
vijay@Ubuntu-19:~$

Rename multiple files

Linux System Administrator has lots of workload, but he remove it easily by using his talent of smart working.

For the example assume you are a system administrator get a folder consist 1000 pdf files and your boss want all files in .doc files.

What will you do now?

Assume if you rename all 1000 files ony by one, how much time will you need to rename these files.

I say “you can do it by single command” and the command name is rename. But rename does not come in Linux pre-installed.

You must install rename in Linux first. I am using Ubuntu 19.04 so You can see demo on Ubuntu.

Install rename on Ubuntu 19.04

vijay@Ubuntu-19:~$sudo apt-get install rename
[sudo] password for vijay: 
Reading package lists... Done
Building dependency tree       
Reading state information... Done
The following NEW packages will be installed:
  rename
0 upgraded, 1 newly installed, 0 to remove and 8 not upgraded.
Need to get 16.1 kB of archives.
After this operation, 48.1 kB of additional disk space will be used.
Get:1 http://in.archive.ubuntu.com/ubuntu disco/universe amd64 rename all 1.10-1 [16.1 kB]
Fetched 16.1 kB in 1s (11.5 kB/s)
Selecting previously unselected package rename.
(Reading database ... 136237 files and directories currently installed.)
Preparing to unpack .../archives/rename_1.10-1_all.deb ...
Unpacking rename (1.10-1) ...
Setting up rename (1.10-1) ...
update-alternatives: using /usr/bin/file-rename to provide /usr/bin/rename (rename) in auto mode
Processing triggers for man-db (2.8.5-2) ...
vijay@Ubuntu-19:~$

Now the next step rename all the files .pdf to .doc

$ rename ‘s/oldfiles/newfiles/’
$rename ‘s/\.pdf$/\.doc/’ *.pdf

vijay@Ubuntu-19:~/Documents~$ls
file10.pdf  file2.pdf  file4.pdf  file6.pdf  file8.pdf  file.pdf    resumex.pdf
file1.pdf   file3.pdf  file5.pdf  file7.pdf  file9.pdf  resume.pdf  vijay3.pdf
vijay@Ubuntu-19:~/Documents~$rename 's/\.pdf$/\.doc/' *.pdf
vijay@Ubuntu-19:~/Documents~$ls
file10.doc  file2.doc  file4.doc  file6.doc  file8.doc  file.doc    resumex.doc
file1.doc   file3.doc  file5.doc  file7.doc  file9.doc  resume.doc  vijay3.doc
vijay@Ubuntu-19:~/Documents$

Graphical Interface to rename file

Linux is growing day by day in matter of usability. Linux has good graphic interface now.

For Example Ubuntu has awesome Graphical User Interface with lots of utilities. You can rename file like windows OS by using graphical inter face.

Follow the given steps to rename file:

Step #1 right click on the file or directory, what do you want to rename. then click on rename.

14-rename-file-in-linux-step-1

Step #2 give the newname to file or directory and click on OK

15-how-to-rename-file-in-linux-step-2

Step #3 check the result whatever you get.

Conclusion

When you start to work on Linux, and become good user of command line, Trust me you don’t like graphical interface any more for work purpose. off-course you will not like to see movie by command line.

So you have seen it easy to learn about “how to rename file in linux” not only this you can now rename multiple files in single command.

If you have any question write in comment or mail me at vijay@cyberpratibha.com.

If Appreciate My Work, You should consider:

Saturday 19 September 2020

Find a file in windows is very easy just go in search bar and search file by name. it is only possible, if your computer has graphical interface in Linux.

Searching files in Windows are easy, Just go to the search box and type your query (name of the file), and hit enter, you will get the result of all files with the name. it happens only in the graphical user interface.

The GUI (Graphical User Interface) is not available in the Linux operating system every time, but the command line interface is available always.

To find a file by name, size, type, etc in the graphical interface is quite easy, And it is not really so easy in CLI (Command Line Interface).

In this article, I am going to cover “How to find a file in Linux by using CLI mode.

When you read the full article you will be expert to find the files in Linux by using the command line interface.

And you will hate GUI for the same work.

The find is one of the most powerful commands in Linux in the system administrator’s point of view.
Find is a command line utility that allows you to search for files and directories in a directory hierarchy based on user-given expression and applies user-specified action on each matched file.

Course Content

Find Command Syntax in Linux

If you want to be an expert in using commands You must know what is the basic syntax of the same command.

Review the basic syntax of find command before go “How to use find command in Linux or how to find a file in Linux by using find command.

The basic usage of find utility expressions take the following form:

Usage: find [-H] [-L] [-P] [-Olevel] [-D debugopts] [path…] [expression]

  • The options attribute [-H] [-L] [-P] [-Olevel] [-D debugopts] controls the treatment of the symbolic links, debugging options and optimization method.
  • The [path… ]an attribute defines the path where find will look for the file. If you want to search in complete system use only / or if you want to search file in etc directory path would be /etc/
  • The [expression] attribute is made up of options, search patterns and actions separated by operators.

Let’s take a look at the following example:

$find -L /etc/ -name passwd

  • Options is -L which allow to follow symbolic links.
  • Path: /etc/ which allow to search entire directory as per path.
  • Expression: -name which allow to search with given name
vijay@Ubuntu-19:~$ find -L /etc -name passwd
/etc/passwd
find: ‘/etc/cups/ssl’: Permission denied
find: ‘/etc/ssl/private’: Permission denied
/etc/pam.d/passwd
/etc/cron.daily/passwd
find: ‘/etc/polkit-1/localauthority’: Permission denied
vijay@Ubuntu-19:~$
vijay@Ubuntu-19:~$ find -L /home/ -name vijay
/home/vijay
vijay@Ubuntu-19:~$

Find a File in Linux by Type

As you know, different files have different types, regular file, directory and more. you can use -type expression to specify file type.

If you want to search file by type then you can use the following expressions:

  • f: a regular file
  • d: directory
  • l: symbolic link
  • c: character devices
  • b: block devices
  • p: named pipe (FIFO)
  • s: socket

Specifying path is really important because if you don’t define path it will search only in current directory.

If you want to search from your current directory then syntax will as following

$find . -type d

From specific directory you must give the right path

$find /etc/ -type d -name passwd

vijay@Ubuntu-19:~$ find /etc -type d -name passwd
find: ‘/etc/cups/ssl’: Permission denied
find: ‘/etc/ssl/private’: Permission denied
find: ‘/etc/polkit-1/localauthority’: Permission denied
vijay@Ubuntu-19:~$
vijay@Ubuntu-19:~$ find /etc -type f -name passwd
/etc/passwd
find: ‘/etc/cups/ssl’: Permission denied
find: ‘/etc/ssl/private’: Permission denied
/etc/pam.d/passwd
/etc/cron.daily/passwd
find: ‘/etc/polkit-1/localauthority’: Permission denied
vijay@Ubuntu-19:~$

Find a File in Linux by Name

You know the file name but forget where is it? you cand find it by using find command.

The most common use of find command is finding files by name. To find a file by its name by using -name expression followed by file name.

To search for a file called vijay.txt in the /home/vijay directory you would use the following command:

vijay@Ubuntu-19:~$ find /home -type f -name vijay.txt
/home/vijay/vijay.txt
vijay@Ubuntu-19:~$

If you are searching a case sensitive file, use -iname instead of -name. Example given below, look and compare the result.

vijay@Ubuntu-19:~$ find /home -type f -name VIJAY.txt
vijay@Ubuntu-19:~$
vijay@Ubuntu-19:~$ find /home -type f -iname VIJAY.txt
/home/vijay/vijay.txt
vijay@Ubuntu-19:~$

Find a File in Linux by Extension

I want to have a look over all files with .log.gz extension files in my home directory. I can search file with extension.

The syntax would we following

vijay@Ubuntu-19:~$ sudo find /var/log -type f -name *.log
/var/log/alternatives.log
/var/log/dpkg.log
/var/log/bootstrap.log
/var/log/fontconfig.log
/var/log/gpu-manager.log
/var/log/auth.log
/var/log/unattended-upgrades/unattended-upgrades-shutdown.log
/var/log/boot.log
/var/log/installer/casper.log
/var/log/kern.log
/var/log/apt/term.log
/var/log/apt/history.log
vijay@Ubuntu-19:~$
vijay@Ubuntu-19:~$ sudo find /var/log -type f -name *.gz
/var/log/dmesg.3.gz
/var/log/dmesg.2.gz
/var/log/dmesg.1.gz
/var/log/installer/initial-status.gz
vijay@Ubuntu-19:~$

Find a File in Linux by Size

You can use -size option to search file based on size. After -size you must define size criteria.

Following suffix can be used to define file size

  • b: 512-byte blocks (default)
  • c: bytes
  • w: two-byte words
  • k: Kilobytes
  • M: Megabytes
  • G: Gigabytes

To find the file with accurate size, you can give the size after using -size option. For example if you want to search file has 256 bytes exactly. then you can use following syntax

You can also search file with greater of less than a specified size. For example if you want to search file greater than 100 MB then use +100 MB and for less than 100 MB use -100 MB.

Find a File in Linux by Modification Date

The find command also allows searching files based on its last modification, access, and change time.

$find /etc/dovecot/conf.d -name “*.conf” -mtime 5

$find /home -mtime +30 -daystart

-amin n: File was last accessed n minutes ago.

anewerfile File was last accessed more recently than file was modified.

atime n: File was last accessed n*24 hours ago. When find figures out how many 24-hour periods ago the file was last accessed, any fractional part is ignored, so to match –atime +1, a file has to have been accessed at least two days ago.

-cmin n : File’s status was last changed n minutes ago.

cnewer file: File’s status was last changed more recently than file was modified.

ctime n: File’s status was last changed n*24 hours ago.

Find a File in Linux by Permissions

To filter the files based on the file / directory permissions, use the -perm option followed by permission number.

You can find all files with permissions of exactly 775 inside the /var/www/html directory. Following syntax will work fine:

$find /var/www/html -perm 775

Two type prefix can be used – or /

When slash / is used as the prefix, then at least one category (user, group or others) must have at least the respective bits set for a file to match.

$find . -perm /444

If minus – is used as the prefix then for the file to match at least the specified bits must be set.

The following command will search for files that have read and write permission for the owner and group and are readable by other users:

find . -perm -664

Find a File in Linux by Owner

The user, who created file in Linux operating system called owner. Linux is a multiple user based operating system.

You are working as a system administrator and want to filter files based on ownership then this method is really very useful.

To search the files in linux system owned by user vijay

Here is a more advanced example, If you want to find all files owned by the user ftp-user and change the ownership of the matched files from ftp-user to www-data:

$find / -user ftp-user -type f -exec chown www-data {} \;

Find and Delete File in Linux

Find and Delete file is considered as two work, one is find the file another is delete the finding files.

If you are SysAdmin and want some delete .temp files then first command (find) will search all .temp files and then -delete option will delete all files.

$find /var/log/ -name ‘*.temp’ -delete

Video: How to Find a File in Linux

Conclusion


Find command is very interesting Linux, you can use it any linux distro like Ubuntu, RHEL, Centos, Kali Linux, Arch Linux, Free BSSD etc.

Expert command over find utility make you advanced user of linux, and find command will help you to work fast.


If you have any question please comment below.

Have a nice day

Cheers! 


Source Find a File in Linux

Friday 11 September 2020

How to install Ubuntu on Virtualbox Step by Step Guide for beginners

 Do you want to learn and practice Linux without install Ubuntu on you hard drive?

Virtual box is best option to run multiple operating system in same time. Meantime you can use your favorite Operating System Windows / Mac and you can learn how to use Linux operating System.

Linux is an Operating System. Before to use it you will have to install first on your Laptop or Desktop. But when you use virtual-box you don’t need to install on hard drive. You can use multiple operating system at same time.

Today I am going to tell you “how to install Ubuntu on virtual box in Windows 10″. This article consists text and images so you can understand better.

For the tutorial, I am using Windows 10 Machine, Virtualbox, and Ubuntu 20.04 ISO image.

Section #1: Software Requirements

I am using windows 10 machine, I have installed VirtualBox on windows machine if you are using Windows / MAC OS you can download and install VirtualBox from given link.

Download Virtualbox: Link Here

When you finish installation of virtualbox then you move to next step >

Download the latest ISO Image of Ubuntu Operating System form following link. because You will need it at the time of installation of Ubuntu on Virtualbox.

Download Latest Ubuntu ISO Image: Link Here

When you have Installed virtualbox on your system and Ubuntu ISO image then move next step >

Section #2: Create Virtual machine compatible to Ubuntu 19.04

Virtual machine is similar as physical machine. It has RAM, Processor, Hard Disk, CD, Network Adapter and other hardware required for a Computer machine.

In virtual machine all hardware will be virtually not physically. Lets create a new virtual machine by following steps:

Step #1 Start Virtualbox

Double click on Virtualbox icon to open virtualbox.

Step #2: Click on New icon, after open VirtualBox manager.

60-New-Virtual-Machine

Step #3 Name and Operating System:

You are going to create virtual machine for Linux – Ubuntu so fill the following system details:

  • Name: Ubuntu 19.04 (You can give name whatever you want)
  • Type: Linux (Type must be Linux)
  • Version: 64-bit (32-bit ISO is not available for latest Ubuntu ISO)
61-name-and-operating-system

Step #4 Memory Size

The recommended size is 1 GB, More RAM size means better performance.

If your computer RAM is more than 4GB then you can give 2 GB. I have 8 GB RAM of my system so I am giving here 2GB.

62-memory-size

Step #5 Hard Disk

Without hard disk, there is no value of you system anymore, In virtual machine you can create virtual hard disk only. It will not impact on your real machine.

You are going to start a fresh, so select second one option.

Create a virtual hard disk now

Click on create for forward next step.

63-hard-disk

Step #6: Had disk file type:

There is multiple types of virtual hard disk. Virtual box supports 3 VDI, VHD and VMDK.

Don’t be confuse select first one VDI (VirtualBox Disk Image)

Click on Next to move next step

type-of-hardisk

Step #7: Storage on physical hard disk

Allocation of storage on physical drive, It may be dynamically or fixed size.

Select Dynamically allocated and click on Next.

Step #8 File location and size:

By default hard disk size will store in C:/ drive in windows.

If you don’t have enough memory in c:/ drive then you can select another drive to save virtual hard disk file.

Click on Folder icon to change storage location.

Recommended size is 10 GB, I suggest you, give hard disk size more than 18 GB.

I am giving 32 GB, you can see in the image given bellow

After assign location and memory click on next to move forward.

You have created virtual machine for Ubuntu 19.04, Now its time to attach virtual DVD in Virtual machine DVD writer

Section #3 Attach Ubuntu ISO image in Virtual Machine

If you have installed any operating system before on machine, then you know very well, you have requirement of Bootable DVD / USB flash drive to install operating system.

Ubuntu ISO image will work as bootable DVD to install operating system on virtual machine.

So your next task is to attach ISO image as DVD. You can do by following given steps.

Step #1 Click on Settings.

You must select created virtual machine before click on settings. then click on setting

67-virtual-machine-settings

Step #2: Choose Virtual Optical Disc (Ubuntu ISO image)

Storage > Empty > Click on Disk Icon > Choose Virtual Optical Disk File..

68-attach-iso-image

Step #3 Browse location of Ubuntu ISO image:

Browse recently downloaded ISO file of Ubuntu, Then click on Open

69-choose-ISO-image

Step #4 Verify connected ISO image:

You can verify as seen in below image.

70-attached-ISO-image

Section #4: Install Ubuntu on Virtualbox Step by Step Guide

In this section, you will learn how to install Ubuntu 20.04 on a Virtual machine. Follow the given steps:

Start Virtual machine

Select virtual machine and click on start.

71-Start-machine

When you click on start the virtual machine will start with bootable ISO image. because new machine doesn’t have an operating system and have a blank hard disk. So it can’t be booted with hard-disk and will boot with DVD.

Step #1 Welcome Screen:

At this screen you will have to select language in left sidebar.

Then click on Install Ubuntu to forward next step.

1-select-langauge

Step #2 Keyboard layout:

Select you keyboard layout and click on continue. If you are not sure about keyboard layout then click on “Detect keyboard Layout”. This option will detect automatic.

2-selecet-keywoard

Step #3 Update and other software:

Select Normal installation, under this option required basic software will install.

In other option select “Download updates while installing Ubuntu”.

3-isntallation-type

Step #4 Installation type:

I assuming you a new user, so select option “Erase disk and install Ubuntu

Warrning: Don’t select this option when you will install on your real machine, If you have data in your hard disk

You can select this option on virtual machine without any fear

Click on Install now to move forward

4-installation-type

Step #5 Write the changes to disk:

Good, When you click on continue, New partition will be created in you virtual drive and formatted.

Click on continue.

5-write-changes-to-disk

Step #6 Where are you?

System want to know your localization, select your zone and click on continue

6-select-your-zone

Step #7 Who are you?

Tell system about yourself like your name, PC name, Username and password.

I suggest you use strong password, It is compulsory to become habitual to put strong password every where

Click on continue:

Step #8 Installation started:

Installation has been started

Sit back on chair and have coffee, Buy one for me, and wait for some moment. installation will be complete soon.

Step #9 Installation complete:

Installation has been completed, now click on “Restart Now”,

Step #10 Login

When your Ubuntu machine will start, it will ask for password. Enter password whatever you set at the time of installation.

Click on Login

Step #12 Make it Full screen:

Press Right Ctrl + F

Select View > Full-screen Mode

72-full-secreen-mode-in-virtualbox
73-swirch-full-screen-mode

Step #13 First Look of Ubuntu 19.04

Conclusion

Now your Ubuntu (Linux) machine is ready to use. You can use it like a real machine. You must read little about virtualbox networking, So you will not face any type of networking problem.

If you have any question you can put in comment box or you can write me directly vijay@cyberpratibha.com without hesitation.

Source: How to install Ubuntu on Virtualbox Step by Step Guide

Join Us with Social Media:

If Appreciate My Work, You should consider: